Membuat Widget Author Plus Follower With CSS

Cara Membuat Widget Author Plus Follower With CSS Di Blogger
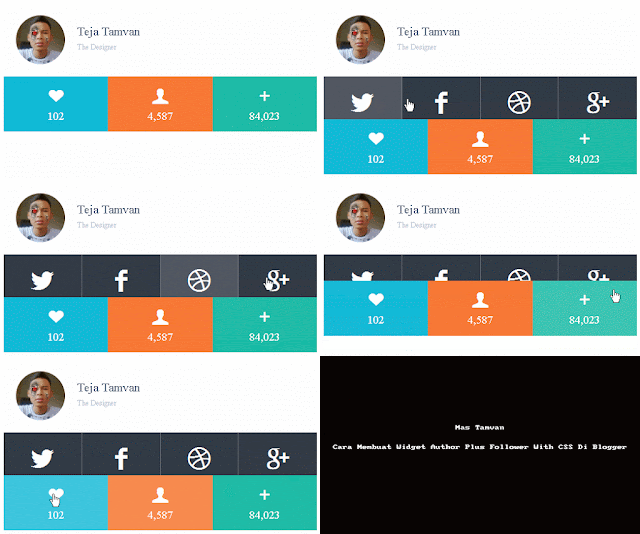
Di pagi yang cerah ini, mas tamvan akan berbagi tutorial cara Membuat Widget Author Plus Follower With CSS Responsive di blogger. Nah untuk demonya silahkan klik di link berikut.
Result
Seperti Biasa, kalian harus masuk terlebih dahulu ke blogger.com
- Masuk Ke, Template -> Edit HTML
- Cari Kode ]]></b:skin> atau </style>
- Setelah ketemu, masukan CSS di bawah ini tepat di atasnya.
/* Widget Author */
 @import url(http://weloveiconfonts.com/api/?family=entypo);
[class*="entypo-"]:before {font-family: 'entypo', sans-serif;}
*{ box-sizing: border-box; }
a { text-decoration: none; transition: all .4s; }
.container { margin: 0 auto; }
.container:hover .author-body { height: 70px; }
.author-body a {color:#fff}
.author2 { overflow: auto; padding: 20px; background: #fff; border-radius: 5px 5px 0 0; font-size:12px; color: #b9becd; }
.author2:before { content: ""; display: block; float: left; width: 80px; height: 80px; margin-right: 20px; background: url("https://blogger.googleusercontent.com/img/b/R29vZ2xl/AVvXsEg8oH0HjQBS0hQFPm8AUG5oFu2nhLB464SnbXzYfSPEXuRsQ0QJpgl8aBb717720fOfkBLFC1XDy4BRFHakQE7atnoe2e-PU2PAzehMHvkKKw_ZJkkGtLHyBfYhwogeWm8DpByv-ifahes/w835-h833-no/Teja.jpg") no-repeat; background-size: 80px; border-radius: 100%; }
.author2  h1 { margin: 15px 0 5px; font-weight: 100; font-size:20px; color: #5e6d81; }
.author-body { height: 0; background: #323a45; color: #fff; vertical-align: middle; transition: all .3s; }
.author-body a { display: inline-block; width: 25%; height: 100%; padding: 20px; border-right: 1px solid rgba(255,255,255,.25); text-align: center; color: #fff; font-size: 2.5em}
.author-body a:hover { background: #515761; }
.author-body a:last-child { border-right: none; }
.foot { /*height: 100px;*/ }
[class^="footItem"] { display: inline-block; width: 33.333333%; padding: 15px 0; text-align: center; color: rgba(255,255,255,.8); font-size: 1.1em; }
[class^="footItem"] span { display: block; font-size: 1.6em; margin-bottom: 5px; color: #fff; }
.footItem1 { background: #14b9d6;    color: white!important;}
.footItem1:hover { background: #5bcee2; }
.footItem2 { background: #f27935;    color: white!important; }
.footItem2:hover { background: #f6a172; }
.footItem3 { background: #1fbba6;     color: white!important;}
.footItem3:hover { background: #63d0c1; }
.widget-content {    box-shadow: 0 0 0 1px #D3D3D3;}
.section:first-child .widget:first-child {margin-bottom:15px}
- Ok, sekarang tinggal di save templatenya.
- Lanjut memasang HTML
- Masuk ke Tataletak -> Klik Tambahkan Gadget / Add Widget.
- Terus Cari HTML/Javascript.
Masukan HTML Berikut di dalamnya [Ganti #Twitter-LINK dan lainnya dengan link sosmed kalian]
<div class="container">
<div class="author2">
<h1>Teja Tamvan</h1>
        The Designer
    </div>
<div class="author-body">
<a href="#Twitter-LINK"><span class="entypo-twitter"></span></a><a href="#Facebook-LINK"><span class="entypo-facebook"></span></a><a href="#Dribble-LINK"><span class="entypo-dribbble"></span></a><a href="#GooglePlus-LINK"><span class="entypo-gplus"></span></a>
</div>
<div class="foot">
<a class="footItem1" href="#"><span class="entypo-heart"></span>102</a><a class="footItem2" href="#"><span class="entypo-user"></span>4,587</a><a class="footItem3" href="#"><span class="entypo-plus"></span>84,023</a>
</div>
</div>
- Save and Done.
Cukup sekain dan teimakasih, semoga tutorial dari mas tamvan ini bermanfaat, jika ada yang tidak di mengerti silahkan bertanya di kolom komentar.
Tidak ada komentar untuk "Membuat Widget Author Plus Follower With CSS"
Posting Komentar